I'm in the gutter business and I visit with a lot of unhappy homeowners and business owners on a daily basis . Their problems with their gutter system range from a contractor who did some fascia replacement and re-hung the gutters and now they don't work to needing new gutters because they assumed the whole house had gutters when they moved in. I realize through my conversations with these clients some have knowledge of gutters and some don't, so I have started posting blogs to try and educate and further educate these clients.
 . Their problems with their gutter system range from a contractor who did some fascia replacement and re-hung the gutters and now they don't work to needing new gutters because they assumed the whole house had gutters when they moved in. I realize through my conversations with these clients some have knowledge of gutters and some don't, so I have started posting blogs to try and educate and further educate these clients.
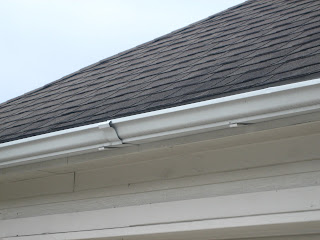
 Some projects you can D.I.Y. but a novice gutter installer is your worst nightmare.Here are some pictures of a home that has D.I.Y. gutters form the Big Box Stores. As you can see they are "seamed" gutters which come in 10 foot sections that need to be joined together then sealed. Chances are that this gutter isn't installed underneath the drip edge flashing. This will allow water to get between the back of the gutter and the fascia board which will ultimately result in wood rot to your fascia.
The next picture is of the garage door trimmer and the trim piece that are getting damaged as a result of the gutter system failing. With a gutter system like this you are setting yourself up for failure. These issues can be avoided by spending a little bit more $ upfront for a professional gutter installation and all your worries are gone.
This is how your investment should be protected. A professional gutter installer will have all the correct tools and materials to complete your job, sometimes in a few hours. The first step is to measure the areas where your gutters are going and "pull" the drip edge flashing. This allows the gutter to fit nicely up against your fascia boards and it doesn't allow water to get in between the gutter and the fascia boards.
The next step is to take those measurements and go to the gutter machine to custom fabricate the seamless gutters.
After the pieces are cut, it's time to secure them to your home. Once the gutter is sandwiched between the flashing and fascia, and the hangers are spaced out every 2', it's time to screw them in. The gutters should show a slight pitch towards the downspouts to assist the drainage of water.
Above are D.T. and JR taking measurements for the gutter installation.
The picture to the left is the gutter being run-out for the installation.
Below left is how the finished gutter is installed, under the flashing, and how the hangers are secured every 2'.
 This picture to the right gives you a good example of how a downspout can blend into a column and the brick base. That's about it for now. We can be seen at http://www.allprogutterservice.com/ or followed on twitter http://www.twitter.com/allprogutters and at http://www.facebook.com/allprogutterservice.com


I can set up my new idea from this post. It gives in depth information. Thanks for this valuable information for all,.
ReplyDeleteKirkland Gutter Replacement